

How To Change Drive Letter In Windows Server 2008
Managing Existing Partitions and Drives
Disk Management provides many ways to manage existing partitions and drives. Use these features to assign drive letters, delete partitions, fix the active partition, and more. In addition, Windows Server 2008 R2 provides other utilities to carry out mutual tasks such every bit converting a volume to NTFS, checking a drive for errors, and cleaning up unused disk space.
Assigning Drive Messages and Paths
You tin assign drives ane drive letter and 1 or more than drive paths, provided that the drive paths are mounted on NTFS drives. Drives don't accept to be assigned a drive alphabetic character or path. A drive with no designators is considered to be unmounted, and you lot tin mount it by assigning a drive letter of the alphabet or path at a later on engagement. You lot need to unmount a drive earlier moving information technology to another computer.
Windows cannot modify the drive letter of arrangement, boot, or folio file volumes. To alter the bulldoze letter of a organization or boot book, yous need to edit the registry every bit described in Microsoft Knowledge Base article 223188 (http://back up.microsoft.com/kb/223188/en-united states). Earlier you can change the drive letter of a page file volume, you lot might need to motility the page file to a different volume.
To manage drive letters and paths, right-click the drive you want to configure in Disk Direction, and and so click Change Bulldoze Letter of the alphabet And Paths. This opens the dialog box shown in Figure 12-7. You lot tin can at present do the following:
-
Add a bulldoze path Click Add, select Mount In The Post-obit Empty NTFS Binder, and then blazon the path to an existing binder, or click Scan to search for or create a folder.
-
Remove a drive path Select the drive path to remove, click Remove, and and then click Aye.
-
Assign a bulldoze letter Click Add, select Assign The Following Bulldoze Letter of the alphabet, and then cull an available letter to assign to the drive.
-
Alter the drive letter Select the electric current drive letter, and then click Change. Select Assign The Following Bulldoze Letter of the alphabet, and then choose a different letter to assign to the drive.
-
Remove a bulldoze letter Select the current drive letter, click Remove, then click Yeah.
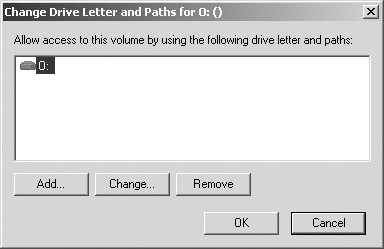
Figure 12-7. You can alter the drive letter and path assignment in the Change Drive Letter of the alphabet And Paths dialog box.
Changing or Deleting the Book Label
The volume label is a text descriptor for a drive. With FAT32, the volume label can exist up to 11 characters and can include spaces. With NTFS, the volume label can exist up to 32 characters. Additionally, although FAT32 doesn't allow you to utilize some special characters, including * / \ [ ] : ; | = , . + " ? < >, NTFS does let you to use these special characters.
Because the book label is displayed when the bulldoze is accessed in various Windows Server 2008 R2 utilities, including Windows Explorer, it can provide information about a drive's contents. You lot tin can change or delete a book label using Disk Management or Windows Explorer.
Using Disk Direction, you can alter or delete a characterization by following these steps:
-
Right-click the partition, and and then click Properties.
-
On the General tab of the Properties dialog box, blazon a new label for the volume in the Label text box or delete the existing characterization. Click OK.
Using Windows Explorer, you can change or delete a label by following these steps:
-
Right-click the drive icon, and so click Properties.
-
On the General tab of the Properties dialog box, type a new label for the book in the Label text box or delete the existing label. Click OK.
Deleting Partitions and Drives
To change the configuration of a drive that'south fully allocated, you might need to delete existing partitions and logical drives. Deleting a partition or a bulldoze removes the associated file system, and all data in the file arrangement is lost. Earlier y'all delete a partition or a drive, you should support whatever files and directories that the partition or drive contains.
You lot can delete a chief partition, a volume, or a logical drive by following these steps:
-
In Deejay Management, correct-click the partition, volume, or drive you want to delete, and and then click Explore. Using Windows Explorer, movement all the data to another volume or verify an existing fill-in to ensure that the data was properly saved.
-
In Disk Direction, right-click the partition, volume, or bulldoze again, so click Delete Partition, Delete Book, or Delete Logical Drive every bit appropriate.
-
Confirm that you want to delete the selected item by clicking Yes.
The steps for deleting an extended sectionalization differ slightly from those for deleting a master partition or a logical drive. To delete an extended partition, follow these steps:
-
Delete all the logical drives on the sectionalization following the steps listed in the previous procedure.
-
Select the extended division area itself and delete it.
Converting a Book to NTFS
Windows Server 2008 R2 provides a utility for converting FAT volumes to NTFS. This utility, Convert (Convert.exe), is located in the %SystemRoot% binder. When you convert a volume using this tool, the file and directory structure is preserved and no information is lost. Keep in mind, however, that Windows Server 2008 R2 doesn't provide a utility for converting NTFS to FAT. The just way to become from NTFS to Fat is to delete the partition by post-obit the steps listed in the previous department then to re-create the sectionalisation as a FAT volume.
The Convert Utility Syntax
Convert is run at the control prompt. If you desire to catechumen a drive, use the post-obit syntax:
convert book /FS:NTFS
where book is the drive letter followed by a colon, bulldoze path, or volume proper name. For example, if you want to convert the D drive to NTFS, use the following control:
catechumen D: /FS:NTFS
If the volume has a label, you are prompted to enter the volume label for the bulldoze. You are not prompted for a book characterization if the disk doesn't have a label.
The consummate syntax for Catechumen is shown hither:
convert volume /FS:NTFS [/Five] [/X] [/CvtArea:filename] [/NoSecurity]
The options and switches for Catechumen are used as follows:
| volume | Sets the volume to piece of work with |
| /FS:NTFS | Converts to NTFS |
| /5 | Sets verbose mode |
| /10 | Forces the volume to dismount before the conversion (if necessary) |
| /CvtArea: filename | Sets the name of a contiguous file in the root directory to be a placeholder for NTFS organization files |
| /NoSecurity | Removes all security attributes and makes all files and directories attainable to the group Everyone |
catechumen C: /FS:NTFS /5
The post-obit sample argument uses Convert:
Using the Catechumen Utility
Before you use the Convert utility, determine whether the partition is being used as the active kicking partition or a arrangement partition containing the operating arrangement. You can convert the active boot partition to NTFS. Doing so requires that the system gain exclusive admission to this partition, which can be obtained but during startup. Thus, if you effort to catechumen the active kicking division to NTFS, Windows Server 2008 R2 displays a prompt request if y'all want to schedule the drive to exist converted the side by side time the organisation starts. If you lot click Yes, you can restart the system to begin the conversion process.
Before the Convert utility actually converts a drive to NTFS, the utility checks whether the drive has plenty free space to perform the conversion. Generally, Catechumen needs a cake of free space that'southward roughly equal to 25 percent of the total space used on the bulldoze. For example, if the drive stores 200 GB of data, Catechumen needs about fifty GB of free space. If the drive doesn't have enough gratuitous space, Convert aborts and tells you that you lot need to free up some space. On the other paw, if the drive has enough free infinite, Convert initiates the conversion. Be patient. The conversion process takes several minutes (longer for large drives). Don't access files or applications on the drive while the conversion is in progress.
You can use the /CvtArea choice to meliorate performance on the volume then that space for the master file table (MFT) is reserved. This option helps to prevent fragmentation of the MFT. How? Over fourth dimension, the MFT might grow larger than the infinite allocated to information technology. The operating organisation must then expand the MFT into other areas of the disk. Although the Disk Defragmenter utility can defragment the MFT, it cannot move the first department of the MFT, and it is very unlikely that in that location will exist infinite after the MFT because this will be filled by file data.
To help prevent fragmentation in some cases, y'all might want to reserve more infinite than the default (12.v pct of the partition or volume size). For example, y'all might want to increase the MFT size if the volume will have many small or average-size files rather than a few large files. To specify the amount of space to reserve, you can apply FSUtil to create a placeholder file equal in size to that of the MFT you want to create. You can then convert the volume to NTFS and specify the proper name of the placeholder file to employ with the /CvtArea pick.
In the post-obit example, you use FSUtil to create a 1.v-GB (i,500,000,000 bytes) placeholder file named Temp.txt:
fsutil file createnew c:\temp.txt 1500000000
To utilise this placeholder file for the MFT when converting bulldoze C to NTFS, you would then type the post-obit control:
convert c: /fs:ntfs /cvtarea:temp.txt
Find that the placeholder file is created on the partition or volume that is being converted. During the conversion process, the file is overwritten with NTFS metadata and whatever unused space in the file is reserved for future utilise by the MFT.
Resizing Partitions and Volumes
Windows Server 2008 R2 doesn't user Ntldr and Boot.ini to load the operating system. Instead, Windows Server 2008 R2 has a preboot environment in which Windows Boot Manager is used to control startup and load the boot awarding you've selected. Windows Kick Manager also finally frees the Windows operating organisation from its reliance on MS-DOS so that you can apply drives in new ways. With Windows Server 2008 R2, you can extend and shrink both basic and dynamic disks. You lot tin use either Disk Management or DiskPart to extend and compress volumes. You cannot shrink or extend striped, mirrored, or striped-with-parity volumes.
In extending a volume, yous convert areas of unallocated space and add them to the existing book. For spanned volumes on dynamic disks, the space tin can come from whatever bachelor dynamic disk, not simply from those on which the volume was originally created. Thus, you can combine areas of free infinite on multiple dynamic disks and employ those areas to increase the size of an existing volume.
You tin can shrink a simple volume or a spanned volume by post-obit these steps:
-
In Deejay Management, correct-click the volume that you desire to shrink, and then click Compress Volume. This option is available only if the volume meets the previously discussed criteria.
-
In the field provided in the Shrink dialog box, shown in Figure 12-viii, enter the amount of space to shrink.
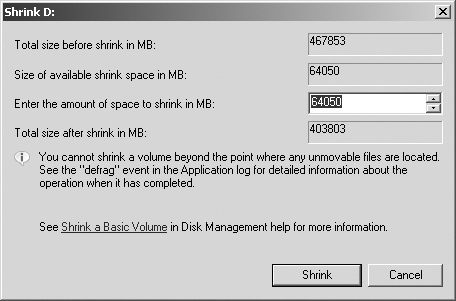
Figure 12-8. Specify the corporeality of space to shrink from the volume.
The Shrink dialog box provides the following information:
-
Total Size Earlier Shrink In MB Lists the full capacity of the volume in megabytes. This is the formatted size of the book.
-
Size Of Available Shrink Space In MB Lists the maximum amount by which the volume can be shrunk. This doesn't stand for the total amount of free space on the volume; rather, information technology represents the corporeality of space that can be removed, non including any information reserved for the primary file table, volume snapshots, folio files, and temporary files.
-
Enter The Corporeality Of Space To Shrink In MB Lists the total corporeality of space that will be removed from the volume. The initial value defaults to the maximum amount of space that tin can be removed from the volume. For optimal bulldoze functioning, you'll desire to ensure that the drive has at least 10 percent of gratis space after the shrink operation.
-
Full Size Later Shrink In MB Lists what the full capacity of the volume will be (in megabytes) after the shrink. This is the new formatted size of the volume.
-
-
Click Shrink to shrink the volume.
Yous can extend a uncomplicated volume or a spanned volume by following these steps:
-
In Deejay Direction, correct-click the book that you want to extend, then click Extend Volume. This option is available only if the book meets the previously discussed criteria and free space is bachelor on one or more than of the system'due south dynamic disks.
-
In the Extend Volume Wizard, read the introductory message, then click Side by side.
-
On the Select Disks page, select the disk or disks from which you lot want to allocate free space. Any disks currently being used by the volume are automatically selected. By default, all remaining complimentary space on those disks is selected for use.
-
With dynamic disks, you can specify the additional space that you desire to utilize on other disks by performing the following tasks:
-
Click the disk, so click Add together to add the disk to the Selected list.
-
Select each disk in the Selected listing, and and then, in the Select The Amount Of Space In MB list, specify the amount of unallocated space to use on the selected disk.
-
-
Click Next, confirm your options, and and so click Terminate.
Repairing Deejay Errors and Inconsistencies
Windows Server 2008 R2 includes feature enhancements that reduce the amount of manual maintenance you must perform on disk drives. The following enhancements have the nearly affect on the way y'all work with disks:
-
Transactional NTFS
-
Self-healing NTFS
Transactional NTFS allows file operations on an NTFS volume to be performed transactionally. This means programs can use a transaction to group sets of file and registry operations so that all of them succeed or none of them succeed. While a transaction is active, changes are non visible outside the transaction. Changes are committed and written fully to disk only when a transaction is completed successfully. If a transaction fails or is incomplete, the program rolls back the transactional work to restore the file system to the land it was in prior to the transaction.
Transactions that span multiple volumes are coordinated by the Kernel Transaction Director (KTM). The KTM supports independent recovery of volumes if a transaction fails. The local resources director for a volume maintains a split up transaction log and is responsible for maintaining threads for transactions separate from threads that perform the file work.
Traditionally, you accept had to use the Check Disk tool to fix errors and inconsistencies in NTFS volumes on a disk. Considering this process can disrupt the availability of Windows systems, Windows Server 2008 R2 uses cocky-healing NTFS to protect file systems without requiring you to use separate maintenance tools to ready problems. Considering much of the cocky-healing procedure is enabled and performed automatically, you might need to perform volume maintenance manually only when you are notified by the operating system that a trouble cannot be corrected automatically. If such an error occurs, Windows Server 2008 R2 notifies you about the problem and provides possible solutions.
Self-healing NTFS has many advantages over Check Disk, including the following:
-
Check Deejay must have exclusive admission to volumes, which means system and kicking volumes can be checked only when the operating organization starts up. On the other mitt, with self-healing NTFS, the file system is always available and does not need to be corrected offline (in most cases).
-
Cocky-healing NTFS attempts to preserve as much data every bit possible if corruption occurs and reduces failed file organization mounting that previously could occur if a volume was known to accept errors or inconsistencies. During restart, self-healing NTFS repairs the book immediately so that information technology can be mounted.
-
Self-healing NTFS reports changes made to the book during repair through existing Chkdsk.exe mechanisms, directory notifications, and update sequence number (USN) journal entries. This feature also allows authorized users and administrators to monitor repair operations through Verification, Waiting For Repair Completion, and Progress Status messages.
-
Cocky-healing NTFS can recover a book if the boot sector is readable only does not identify an NTFS volume. In this case, you must run an offline tool that repairs the boot sector and so allow self-healing NTFS to initiate recovery.
Although self-healing NTFS is a terrific enhancement, at times you may want to (or may have to) manually check the integrity of a deejay. In these cases, you can use Check Disk (Chkdsk.exe) to check for and (optionally) repair problems found on FAT, FAT32, and NTFS volumes. Although Check Disk can check for and correct many types of errors, the utility primarily looks for inconsistencies in the file organization and its related metadata. One of the ways Check Deejay locates errors is by comparison the volume bitmap to the deejay sectors assigned to files in the file system. Beyond this, the usefulness of Bank check Disk is rather express. For example, Check Disk tin can't repair corrupted information inside files that appear to be structurally intact.
Running Check Deejay from the Command Line
Y'all can run Cheque Disk from the command prompt or inside other utilities. At a command prompt, you lot can test the integrity of the Eastward drive by typing the post-obit control:
chkdsk E:
To find and repair errors that are on the Due east drive, use the following command:
chkdsk /f E:
The complete syntax for Check Disk is shown here:
chkdsk [book[[path]filename]]] [/F] [/V] [/R] [/X] [/I] [/C] [/L[:size]]
The options and switches for Bank check Deejay are used as follows:
| volume | Sets the volume to work with. |
| [path]filename | FAT/FAT32 only: Specifies files to check for fragmentation. |
| /F | Fixes errors on the disk. |
| /V | On Fatty/FAT32: Displays the full path and name of every file on the disk. On NTFS: Displays cleanup messages, if any. |
| /R | Locates bad sectors and recovers readable information (implies /F). |
| /X | Forces the volume to dismount first if necessary (implies /F). |
| /I | NTFS only: Performs a minimum bank check of alphabetize entries. |
| /C | NTFS only: Skips checking of cycles within the folder structure. |
| /50:size | NTFS but: Changes the log file siz |
Running Check Disk Interactively
Y'all tin run Check Disk interactively by using Windows Explorer or Disk Management. Follow these steps:
-
Correct-click the drive, then click Properties.
-
On the Tools tab of the Properties dialog box, click Check Now.
-
As shown in Figure 12-nine, y'all tin now exercise the following:
-
Check for errors without repairing them. Click Offset without selecting either of the check boxes.
-
Bank check for errors and fix them. Make the appropriate selections in the check boxes to fix file system errors, recover bad sectors, or both, and so click Starting time.
-

Figure 12-9. Utilise Check Disk to check a disk for errors and repair them.
Defragmenting Disks
Any time you lot add files to or remove files from a bulldoze, the data on the drive tin become fragmented. When a drive is fragmented, large files can't be written to a single continuous expanse on the disk. As a result, the operating organization must write the file to several smaller areas on the disk, which means more than fourth dimension is spent reading the file from the disk. To reduce fragmentation, Windows Server 2008 R2 tin manually or automatically defragment disks using Deejay Defragmenter. The more than frequently data is updated on drives, the more than often yous should run this tool.
Y'all tin manually defragment a disk by following these steps:
-
In Server Manager, select the Storage node and then the Disk Direction node. Right-click a drive, then click Properties.
-
On the Tools tab, click Defragment Now. In the Deejay Defragmenter dialog box, select a disk, and so click Clarify Disk. Deejay Defragmenter then analyzes the disk to decide whether information technology needs to be defragmented. If so, it recommends that you defragment at present.
-
In the Disk Defragmenter dialog box, select a deejay, and then click Defragment Disk.
When you lot enable automatic defragmentation, Windows Server 2008 R2 runs Deejay Defragmenter automatically on a specific schedule, such as at one:00 A.1000. every Midweek. As long as the computer is powered on at the scheduled run time, automatic defragmentation occurs. Yous tin can configure and manage automated defragmentation by following these steps:
-
In Server Managing director, select the Storage node and then the Deejay Management node. Correct-click a bulldoze, and so click Backdrop.
-
On the Tools tab, click Defragment At present. This displays the Disk Defragmenter dialog box, shown in Figure 12-ten.
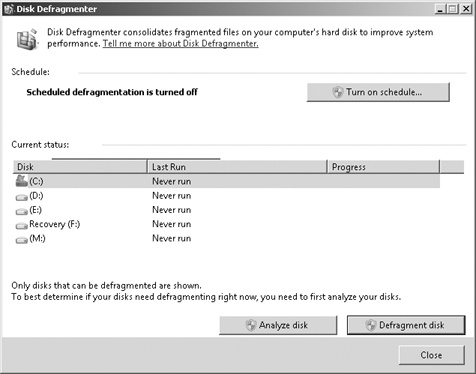
Effigy 12-ten. Disk Defragmenter analyzes and defragments disks efficiently.
-
To cancel automated defragmentation, click Configure Schedule, articulate Run On A Schedule, and then click OK. Click Close, and skip the remaining steps.
-
To enable automated defragmentation, click Turn On Schedule. In the Alter Schedule dialog box, shown in Figure 12-11, select Run On A Schedule, and then set the run schedule. In the Frequency list, you tin can choose Daily, Weekly, or Monthly. If you cull a weekly or monthly run schedule, you need to select the run solar day of the calendar week or calendar month from the Day list. Finally, the Time list lets you ready the time of the day that automatic defragmentation should occur.
-
If you desire to modify the run schedule, click Configure Schedule. In the Change Schedule dialog box, shown in Figure 12-11, set the run schedule equally discussed in the previous step.
-
If you want to manage which disks are defragmented, click Select Disks. In the Select Disks For Schedule dialog box, select which disks should be defragmented. By default, all disks installed inside or connected to the figurer are defragmented, and any new disks are defragmented automatically as well. In the Disks To Include In Schedule list, select the check boxes for disks that should exist defragmented automatically and clear the bank check boxes for disks that should not be defragmented automatically. Click OK.
-
Click OK, then click Shut to salvage your settings.
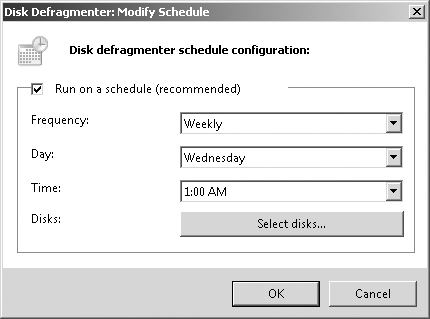
Effigy 12-11 . Ready the run schedule for automated defragmentation.
Compressing Drives and Information
When you lot format a drive for NTFS, Windows Server 2008 R2 allows you to plough on the congenital-in pinch characteristic. With pinch, all files and directories stored on a drive are automatically compressed when they're created. Because this compression is transparent to users, compressed data tin can be accessed just like regular data. The deviation is that you can store more information on a compressed drive than y'all can on an uncompressed drive.
Compressing Drives
To compress a drive and all its contents, follow these steps:
-
In Windows Explorer or Disk Management, right-click the drive that you lot want to compress, and then click Properties.
-
On the General tab, select Compress Drive To Save Disk Infinite, and then click OK.
-
In the Confirm Attribute Changes dialog box, select whether to employ the changes to subfolders and files, and so click OK.
Compressing Directories and Files
If you make up one's mind not to compress a drive, Windows Server 2008 R2 lets you selectively compress directories and files. To shrink a file or directory, follow these steps:
-
In Windows Explorer, right-click the file or directory that you desire to compress, then click Properties.
-
On the General tab of the Properties dialog box, click Advanced. In the Avant-garde Attributes dialog box, select the Compress Contents To Save Disk Infinite check box, equally shown in Effigy 12-12. Click OK twice.
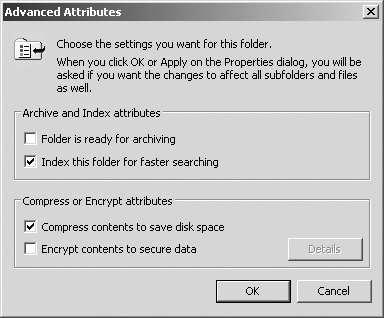
Effigy 12-12. With NTFS, you can compress a file or directory past selecting the Shrink Contents To Save Disk Infinite cheque box in the Advanced Attributes dialog box.
For an individual file, Windows Server 2008 R2 marks the file as compressed and then compresses it. For a directory, Windows Server 2008 R2 marks the directory as compressed and then compresses all the files in it. If the directory contains subfolders, Windows Server 2008 R2 displays a dialog box that allows you to compress all the subfolders associated with the directory. Simply select Apply Changes To This Folder, Subfolders, And Files, and then click OK. Once you compress a directory, any new files added or copied to the directory are compressed automatically.
Expanding Compressed Drives
Y'all tin remove pinch from a drive by following these steps:
-
In Windows Explorer or Deejay Management, correct-click the drive that contains the data yous want to expand, and so click Properties.
-
Clear the Compress Drive To Save Disk Space cheque box, and then click OK.
-
In the Confirm Attribute Changes dialog box, select whether to apply the change to subfolders and files, and and so click OK.
Expanding Compressed Directories and Files
If y'all decide that you want to aggrandize a compressed file or directory, follow these steps:
-
Right-click the file or directory in Windows Explorer, and then click Backdrop.
-
On the General tab of the Properties dialog box, click Advanced. Clear the Compress Contents To Salvage Disk Infinite cheque box. Click OK twice.
With files, Windows Server 2008 R2 removes compression and expands the file. With directories, Windows Server 2008 R2 expands all the files within the directory. If the directory contains subfolders, you also have the opportunity to remove compression from the subfolders. To practise this, select Apply Changes To This Folder, Subfolders, And Files when prompted, then click OK.
Encrypting Drives and Information
NTFS has many advantages over other file systems that yous can use with Windows Server 2008 R2. One of the major advantages is the adequacy to automatically encrypt and decrypt information using the Encrypting File Organization (EFS). When you encrypt data, you lot add an actress layer of protection to sensitive information, and this actress layer acts as a security blanket blocking all other users from reading the contents of the encrypted files. Indeed, one of the great benefits of encryption is that merely the designated user tin can access the information. This benefit is besides a disadvantage in that the user must remove encryption before authorized users can access the information.
Understanding Encryption and the Encrypting File Organisation
File encryption is supported on a per-folder or per-file footing. Any file placed in a folder marked for encryption is automatically encrypted. Files in encrypted format can be read only by the person who encrypted the file. Earlier other users can read an encrypted file, the user must decrypt the file or grant special access to the file by adding a user'southward encryption central to the file.
Every encrypted file has the unique encryption key of the user who created the file or currently has ownership of the file. An encrypted file can be copied, moved, or renamed just similar any other file, and in nearly cases these deportment don't affect the encryption of the data. (For details, meet "Working with Encrypted Files and Folders" later in this chapter.) The user who encrypts a file ever has access to the file, provided that the user's public-cardinal certificate is available on the estimator that he or she is using. For this user, the encryption and decryption process is handled automatically and is transparent.
EFS is the process that handles encryption and decryption. The default setup for EFS allows users to encrypt files without needing special permission. Files are encrypted using a public/private cardinal that EFS automatically generates on a per-user basis.
Encryption certificates are stored as part of the data in user profiles. If a user works with multiple computers and wants to use encryption, an administrator needs to configure a roaming profile for that user. A roaming contour ensures that the user'south contour data and public-key certificates are accessible from other computers. Without this, users won't be able to access their encrypted files on another computer.
EFS has a built-in data recovery organization to guard against information loss. This recovery system ensures that encrypted data can be recovered in the outcome that a user's public-key certificate is lost or deleted. The most mutual scenario for this is when a user leaves the company and the associated user account is deleted. A manager might have been able to log on to the user'south account, check files, and salvage important files to other folders, only if the user account has been deleted, encrypted files will be accessible only if the encryption is removed or if the files are moved to a Fat or FAT32 volume (where encryption isn't supported).
To access encrypted files after the user account has been deleted, you need to utilise a recovery agent. Recovery agents have admission to the file encryption primal necessary to unlock information in encrypted files. To protect sensitive data, however, recovery agents don't take access to a user'southward private key or whatsoever private key data.
Windows Server 2008 R2 won't encrypt files without designated EFS recovery agents. Therefore, recovery agents are designated automatically, and the necessary recovery certificates are generated automatically also. This ensures that encrypted files tin can ever exist recovered.
EFS recovery agents are configured at two levels:
-
Domain The recovery amanuensis for a domain is configured automatically when the starting time Windows Server 2008 R2 domain controller is installed. Past default, the recovery agent is the domain administrator. Through Group Policy, domain administrators can designate additional recovery agents. Domain administrators can also delegate recovery agent privileges to designated security administrators.
-
Local estimator When a figurer is function of a workgroup or in a stand up-solitary configuration, the recovery agent is the administrator of the local computer by default. Boosted recovery agents can be designated. Further, if you lot want local recovery agents in a domain environment rather than domain-level recovery agents, you must delete the recovery policy from Group Policy for the domain.
You can delete recovery agents if you don't want them to be used. However, if you lot delete all recovery agents, EFS volition no longer encrypt files. One or more than recovery agents must exist configured for EFS to function.
Encrypting Directories and Files
With NTFS volumes, Windows Server 2008 R2 lets you select files and folders for encryption. When a file is encrypted, the file information is converted to an encrypted format that tin can be read only by the person who encrypted the file. Users tin can encrypt files only if they have the proper access permissions. When you lot encrypt folders, the folder is marked as encrypted, but but the files inside it are actually encrypted. All files that are created in or added to a folder marked as encrypted are encrypted automatically.
To encrypt a file or directory, follow these steps:
-
Right-click the file or directory that y'all want to encrypt, then click Properties.
-
On the General tab of the Properties dialog box, click Advanced, then select the Encrypt Contents To Secure Data check box. Click OK twice.
For an individual file, Windows Server 2008 R2 marks the file as encrypted and then encrypts it. For a directory, Windows Server 2008 R2 marks the directory as encrypted and then encrypts all the files in information technology. If the directory contains subfolders, Windows Server 2008 R2 displays a dialog box that allows you to encrypt all the subfolders associated with the directory. Simply select Employ Changes To This Folder, Subfolders, And Files, and and then click OK.
You can grant special access to an encrypted file or binder by right-clicking the file or binder in Windows Explorer and so selecting Properties. On the General tab of the Backdrop dialog box, click Advanced. In the Advanced Attributes dialog box, click Details. In the Encryption Details For dialog box, users who have access to the encrypted file are listed by name. To allow another user access to the file, click Add. If a user certificate is available for the user, select the user's proper noun in the list provided, and then click OK. Otherwise, click Notice User to locate the certificate for the user.
Working with Encrypted Files and Folders
Previously, I said that you can re-create, move, and rename encrypted files and folders just similar whatever other files. This is true, but I qualified this by saying "in most cases." When you lot work with encrypted files, you'll have few problems as long equally yous piece of work with NTFS volumes on the aforementioned computer. When you piece of work with other file systems or other computers, you might run into issues. Two of the most common scenarios are the following:
-
Copying between volumes on the same figurer When you copy or move an encrypted file or folder from 1 NTFS volume to some other NTFS volume on the aforementioned computer, the files remain encrypted. However, if you re-create or motility encrypted files to a Fat or FAT32 volume, the files are decrypted before transfer and so transferred as standard files. FAT and FAT32 don't support encryption.
-
Copying between volumes on a different computer When you copy or movement an encrypted file or binder from i NTFS volume to another NTFS volume on a dissimilar computer, the files remain encrypted as long equally the destination computer allows you lot to encrypt files and the remote computer is trusted for delegation. Otherwise, the files are decrypted and then transferred every bit standard files. The same is true when y'all copy or move encrypted files to a FAT or FAT32 volume on another computer. FAT and FAT32 don't support encryption.
After you transfer a sensitive file that has been encrypted, you might want to confirm that the encryption is still applied. Right-click the file and so select Properties. On the General tab of the Properties dialog box, click Advanced. The Encrypt Contents To Secure Data option should be selected.
Configuring Recovery Policy
Recovery policies are configured automatically for domain controllers and workstations. Past default, domain administrators are the designated recovery agents for domains, and the local administrator is the designated recovery agent for a stand-lone workstation.
Through the Grouping Policy console, you lot can view, assign, and delete recovery agents. To do that, follow these steps:
-
Open the Group Policy panel for the local computer, site, domain, or organizational unit of measurement you lot want to work with. For details on working with Group Policy, see "Understanding Group Policies" in Affiliate v. "Automating Administrative Tasks, Policies, and Procedures".
-
Open the Encrypted Data Recovery Agents node in Group Policy. To exercise this, aggrandize Computer Configuration, Windows Settings, Security Settings, and Public Key Policies, and and so select Encrypting File Organisation.
-
The pane at the right lists the recovery certificates currently assigned. Recovery certificates are listed according to who issued them, who they are issued to, expiration information, purpose, and more.
-
To designate an additional recovery agent, right-click Encrypting File Arrangement, and and so click Add Data Recovery Agent. This starts the Add Recovery Agent Wizard, which you can employ to select a previously generated document that has been assigned to a user and marker information technology every bit a designated recovery certificate. Click Next.
-
On the Select Recovery Agents page, you can select certificates published in Agile Directory or utilise certificate files. If y'all desire to use a published certificate, click Scan Directory, and and so, in the Find Users, Contacts, And Groups dialog box, select the user you desire to work with. You'll then be able to utilize the published document of that user. If you want to apply a certificate file, click Browse Folders. In the Open dialog box, utilize the options provided to select and open up the certificate file you want to use.
-
To delete a recovery agent, select the recovery agent's certificate in the right pane, and so printing Delete. When prompted to confirm the action, click Yeah to permanently and irrevocably delete the document. If the recovery policy is empty (pregnant that it has no other designated recovery agents), EFS volition be turned off so that files can no longer be encrypted.
Decrypting Files and Directories
If you want to decrypt a file or directory, follow these steps:
-
In Windows Explorer, right-click the file or directory, and and then click Properties.
-
On the General tab of the Properties dialog box, click Avant-garde. Clear the Encrypt Contents To Secure Data bank check box. Click OK twice.
With files, Windows Server 2008 R2 decrypts the file and restores it to its original format. With directories, Windows Server 2008 R2 decrypts all the files within the directory. If the directory contains subfolders, you also accept the selection to remove encryption from the subfolders. To practice this, select Employ Changes To This Folder, Subfolders, And Files when prompted, so click OK.
Source: https://www.microsoftpressstore.com/articles/article.aspx?p=2232126&seqNum=5
Posted by: englishwilout.blogspot.com
0 Response to "How To Change Drive Letter In Windows Server 2008"
Post a Comment